
Android project modularisation in Gradle
Why to modularize?
Most new IT projects planned to be simple and small apps start as monoliths – as one codebase containing all the code in a single module. In most cases simply called the app module. As the projects grow and we face scalability issues it’s time to get rid of single-module development and split the code into multiple modules. We want to achieve better Separation of Concerns – each module should have a single responsibility with basic functionality (core-module) or implement a feature. Gradle-modules compared to packages are separate sub-projects that can be included in each other as dependencies. They define „borders” and limit the visibility better than packages.
Each module is compiled independently and can be built as a JAR for JVM projects or AAR library for Android projects, so it can be shared with another project as Maven dependency.
INFO: Below examples refer to Android projects, but you may also apply these concepts in any Gradle project.
Modules in Gradle
Modules are realized as sub-projects in Gradle. We reference each module with a prefixed colon e.g. :core
How to create a module?
Follow below steps to create a module with the name core:
- put include ':core' into settings.gradle
- create a directory with name core at the root level
- create a build.gradle file and apply library plugins (later you will see how to apply them centrally)
- create an AndroidManifest.xml file
- define the code in src/main/kotlin/com/foo/bar/core
- import the core-module where you need it with: implementation project(':core')
- click the Gradle sync-button
- done
- now you can import the module using implementation(project(":base:core")) in the „consumer” module
Module groups
Modules can also be grouped, which creates a more clear project structure. In settings.gradle just prefix the file with a colon and the group name :common:core.
You will also need to put the module into the common directory, eventually adjust the package name and call Gradle to sync the project
How to split the monolith?
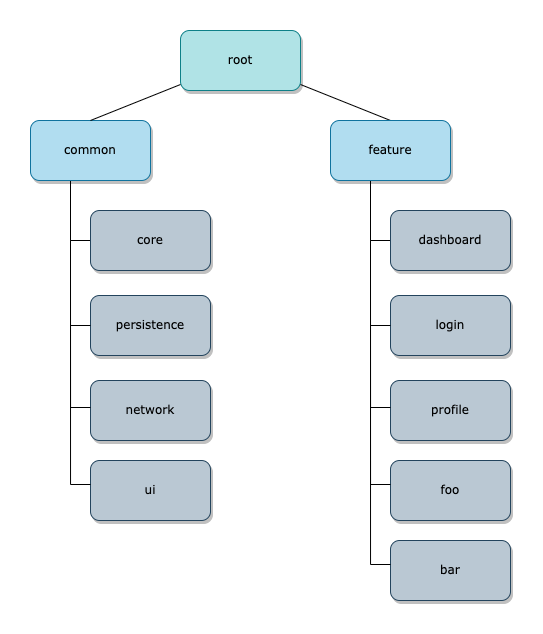
You can split the codebase and define modules by functionality. Give each module a suitable name so the purpose is easy to find out. For a better project structure put each into a feature-group.
It’s very probable that you also will need some common modules with code that will be shared between feature-modules.
So, our project structure could look as follows:
If you ever decide to start a new project you could build all of the common-modules to libraries and use them as dependencies in this new project.
Best practices
What should you pay attention to while developing modules?
Hide all you can
In Kotlin the internal keyword should be used to reduce the visibility of a code (e. g. function or class) to a module. You can use it to hide the implementation details for other modules. It is important to give each module a clear and, above all, minimal API, i.e. to mark all interfaces that are not directly addressed by other modules as internal.
We reduce the amount of code to be indexed by the IDE as hidden components don’t need to be visible in other modules.
Packages
To easier identify the module of a part of code name the packages by modules. For a com.foo.bar project and storage module: com.foo.bar.storage
When you also grouped the modules, put also the group-name into the package-name. For a data group and storage module: com.foo.bar.data.storage
Don’t repeat common script logic
The more modules we got, the more worth it is to implement the common scripts centrally. One of the solutions can be to put the logic into subprojects { project -> … }closure of the root’s build.gradle file, to for example define the Gradle-plugins and set standard properties:
implementation vs. api
In Gradle it’s common to define a dependency of a module as implementation:
There’s an alternative – the api keyword. It defines a dependency as transitive, meaning that a child’s dependency will also automatically be imported in parent’s module.
core/build.gradle
dashboard/build.gradle
Use api if you import a library in each dependent module or this library is used in the API of a module e. g. a type is used in signature of a function e. g. fun getAllCountries(): Single<Country>
Bonus: performance increase
As a bonus we reduce the build time as the sub-projects (modules) can be built parallel. Put org.gradle.parallel=true in gradle.properties of the root project or use the --parallel switch when executing tasks (see parallel execution). Modules also help Gradle to limit the amount of code to compile – only modules (and dependent modules) with changes will need to get compiled.
Conclusion
Project modularisation is a good practice, as you can better separate the concerns, make your project structure easier to explore and understand. As an extra benefit you will get faster build times. Each module can be built as a library and deployed to a public repository making it available for other projects.
Join Mobile Team

Isn't it great?